Allegro Trains delivers an optimized, seamless, and scalable solution for training on DGX machines with ML-Ops and experiment management features.
The Allegro Trains platform is a full system open source ML / DL experiment manager and ML-Ops solution. It is composed of a Python SDK, server, Web UI, and execution agents. Allegro Trains enables data scientists and data engineers to effortlessly track, manage, compare, and collaborate on their experiments as well as easily manage their training workloads on remote machines. Allegro Trains is designed for effortless integration so that teams can preserve their existing methods and practices. Use it on a daily basis to boost collaboration and visibility, or use it to automatically collect your experimentation logs, outputs, and data to one centralized server.
An Auto-Magical Experiment Manager, Version Control and MLOps solution
With only two lines added to your code, the Allegro Trains Python package automatically tracks:
- Git repository, branch, commit id, entry point, and local git diff
- Python environment (including specific packages & versions)
- stdout and stderr
- Resource Monitoring (CPU/GPU utilization, temperature, IO, network, etc.)
- Hyper-parameters
- ArgParser for command line parameters with currently used values
- Explicit parameters dictionary
- TensorFlow Defines (absl-py)
- Initial model weights file
- Model snapshots (With optional automatic upload to central storage: Shared folder, S3, GS, Azure, Http)
- Artifacts log & store (Shared folder, S3, GS, Azure, Http)
- Tensorboard/TensorboardX scalars, metrics, histograms, images (with audio coming soon)
- Matplotlib & Seaborn
> Supported frameworks: Tensorflow, PyTorch, Keras, XGBoost and Scikit-Learn (MxNet is coming soon) > Includes seamless integration (including version control) with Jupyter Notebook and PyCharm remote debugging
Use the Trains Demo Server to try out Trains and test your code with no additional setup.
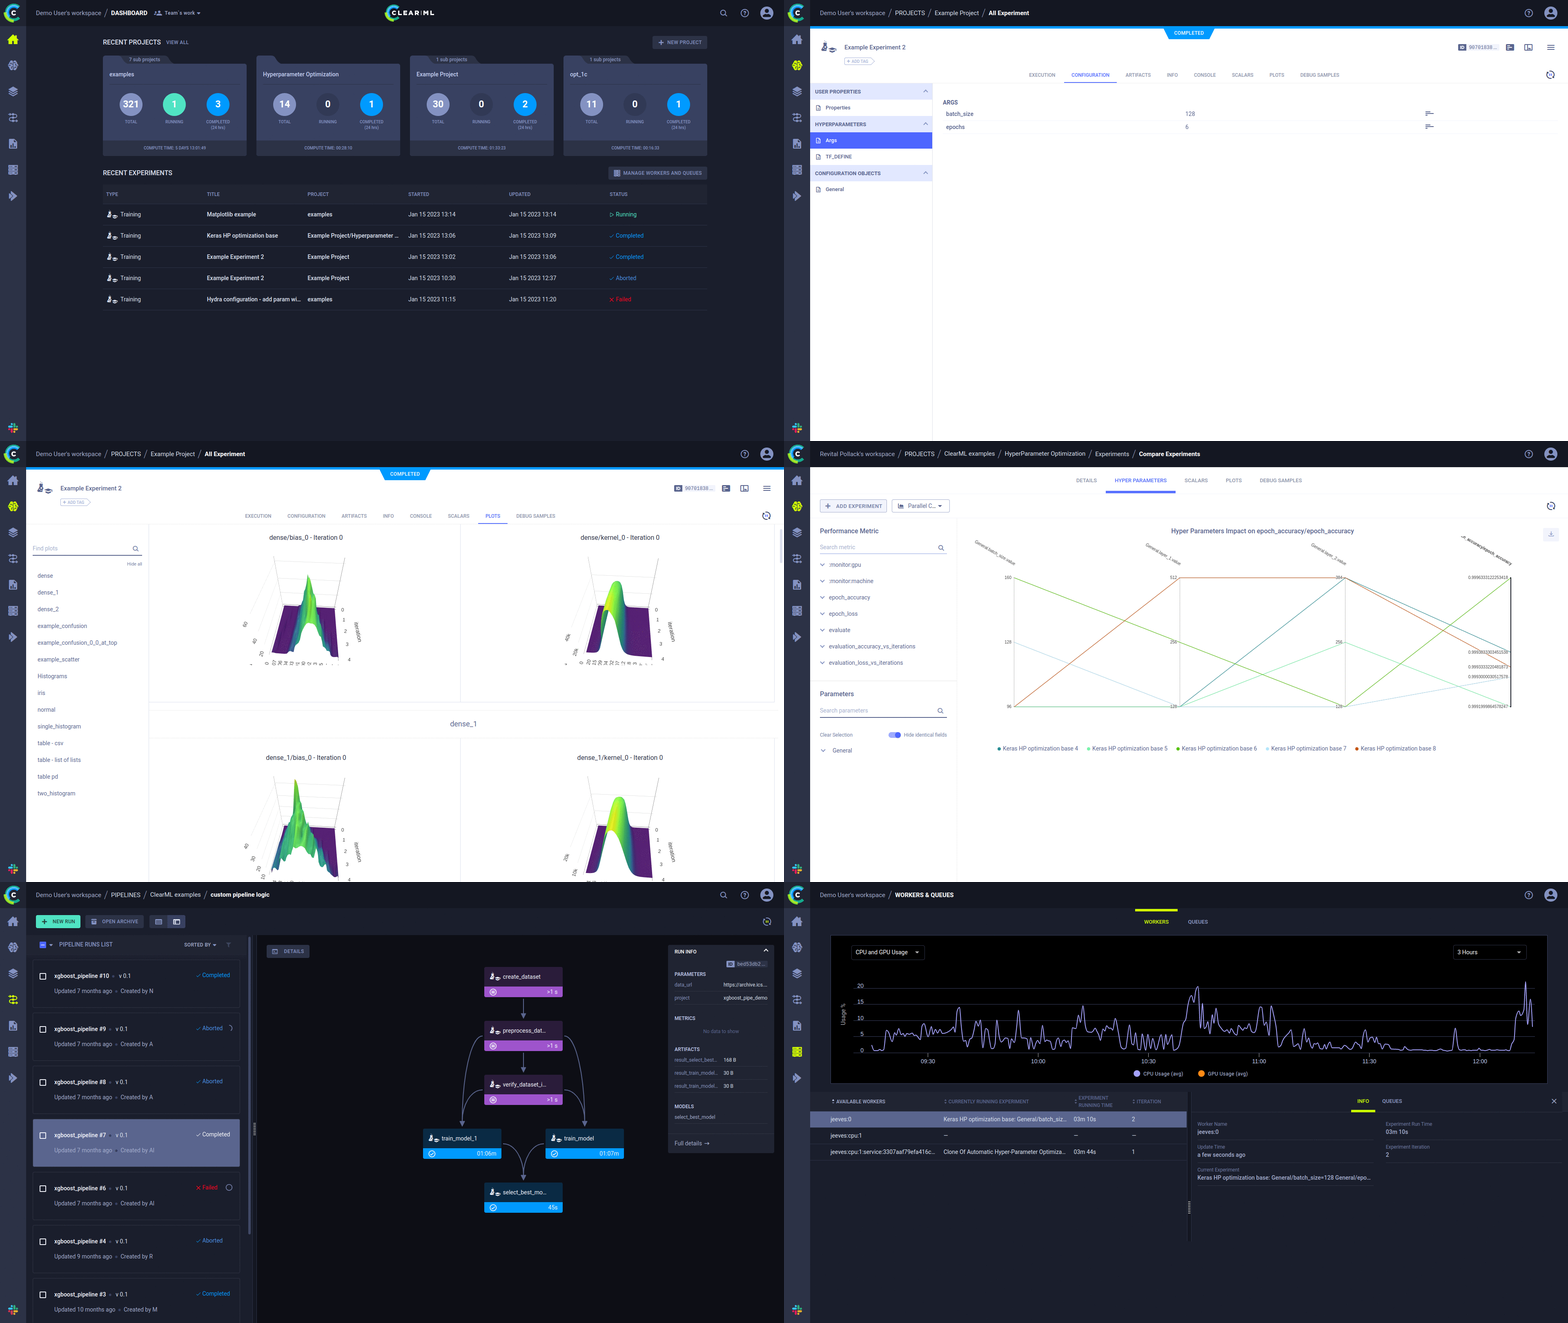
For more information on using the Trains python package, see our Quick Start Guide or the complete Trains Documentation page.
Trains Agent: Simple and Flexible Experiment Orchestration
Using the Trains Agent and zero configuration, you can now set up a dynamic AI experiment cluster
Trains Agent was built to address the DL/ML R&D DevOps needs:
- Easily add & remove machines from the cluster
- Reuse machines without the need for any dedicated containers or images
- Combine GPU resources across any cloud and on-prem
- No need for yaml/json/template configuration of any kind
- User-friendly UI
- Manageable resource allocation that can be used by researchers and engineers
- Flexible and controllable scheduler with priority support
- Automatic instance spinning in the cloud (coming soon)
Trains Agent executes experiments using the following process
- Create a new virtual environment (or launch the selected docker image)
- Clone the code into the virtual-environment (or inside the docker)
- Install python packages based on the package requirements listed for the experiment
- Special note for PyTorch: The Trains Agent will automatically select the torch packages based on the CUDA_VERSION environment variable of the machine
- Execute the code while monitoring the process
- Log all stdout/stderr in the Trains UI, including the cloning and installation process, for easy debugging
- Monitor the execution and allow you to manually abort the job using the Trains UI (or, in the unfortunate case of a code crash, catch the error and signal the experiment has failed)
For more information on using the Trains Agent, see Using the Trains Agent or the complete Trains Documentation page.
Deploying the Allegro Trains platform
The Trains Server is the backend service infrastructure for Trains. It allows multiple users to collaborate and manage their experiments. By default, Allegro Trains is set up to work with the Trains Demo Server, which is open to anyone and resets periodically. In order to host your own server, you will need to install Trains Server and point Trains to it.
Trains Server contains the following components:
- The Trains Web-App, a single-page UI for experiment management and browsing
- RESTful API for:
- Documenting and logging experiment information, statistics, and results
- Querying experiments history, logs, and results
- Locally-hosted file server for storing images and models making them easily accessible using the Trains Web-App
Follow the instructions below to add and deploy Trains Server (and Trains Agents) to your Kubernetes clusters using Helm.
Prerequisites
-
a Kubernetes cluster
-
kubectlis installed and configured (see Install and Set Up kubectl in the Kubernetes documentation) -
helminstalled (see Installing Helm in the Helm documentation) -
one node labeled
app: trainsImportant: Trains Server deployment uses node storage. If more than one node is labeled as
app: trainsand you redeploy or update later, then Trains Server may not locate all of your data.
Set the required Elasticsearch configuration for Docker
Trains Server uses Elasticsearch which requires some specific system settings (for more information, see Notes for production use and defaults):
-
Connect to the node you labeled as
app=trainsIf your system contains a
/etc/sysconfig/dockerDocker configuration file, Add the options in quotes to the available arguments in theOPTIONSsection:OPTIONS="--default-ulimit nofile=1024:65536 --default-ulimit memlock=-1:-1"Otherwise, edit
/etc/docker/daemon.json(if it exists) or create it (if it does not exist).
Add or modify thedefaults-ulimitssection as shown below. Be sure thedefaults-ulimitssection contains thenofileandmemlocksub-sections and values shown.Note: Your configuration file may contain other sections. If so, confirm that the sections are separated by commas (valid JSON format). For more information about Docker configuration files, see Daemon configuration file, in the Docker documentation.
The Trains Server required defaults values are (json):
{ "default-ulimits": { "nofile": { "name": "nofile", "hard": 65536, "soft": 1024 }, "memlock": { "name": "memlock", "soft": -1, "hard": -1 } } } -
Set the Maximum Number of Memory Map Areas
Elastic requires that the vm.max_map_count kernel setting, which is the maximum number of memory map areas a process can use, is set to at least 262144.
For CentOS 7, Ubuntu 16.04, Mint 18.3, Ubuntu 18.04 and Mint 19.x, we tested the following commands to set vm.max_map_count:
 echo "vm.max_map_count=262144" > /tmp/99-trains.conf
 sudo mv /tmp/99-trains.conf /etc/sysctl.d/99-trains.conf
 sudo sysctl -w vm.max_map_count=262144
For information about setting this parameter on other systems, see the elastic documentation.
-
Restart docker:
sudo service docker restart
Add Trains Server and Agents to the Kubernetes Cluster Using Helm
-
Fetch the Trains Helm chart to your local directory:
helm fetch https://helm.ngc.nvidia.com/partners/charts/trains-chart-0.14.1+1.tgz -
By default, the Trains Server deployment uses storage on a single node (labeled
app=trains). To change the type of storage used (for example NFS), see Configuring trains-server storage for NFS. -
By default, one instance of Trains Agent is created in the
trainsKubernetes cluster. To change this setting, create a localvalues.yamlas specified in Configuring Trains Agents in your cluster. -
Install
trains-charton your cluster:helm install trains-chart-0.14.1+1.tgz --namespace=trains --name trains-serverAlternatively, in case you've created a local
values.yamlfile, use:helm install trains-chart-0.14.1+1.tgz --namespace=trains --name trains-server --values values.yamlA
trainsnamespace is created in your cluster and Trains Server and Agent(s) are deployed in it.
Network Configuration
Accessing the Trains Server
After the Trains Server is deployed, the services expose the following node ports:
- API server on
30008 - Web server on
30080 - File server on
30081
For example, to access the Trains Web-App point your browser to http://[trains-server-node-ip]:30080 where the Trains Server node is the node labeled app=trains.
Accessing the Trains Server using subdomains
Access Trains Server by creating a load balancer and domain name with records pointing to the load balancer.
Once you have a load balancer and domain name set up, follow these steps to configure access Trains Server on your Kubernetes cluster:
-
Create domain records
-
Create 3 records to be used for Trains Web-App, File server and API access using the following rules:
app.[your domain name]files.[your domain name]api.[your domain name]
For example,
app.trains.mydomainname.com,files.trains.mydomainname.comandapi.trains.mydomainname.com
-
-
Point the records you created to the load balancer
-
Configure the load balancer to redirect traffic coming from the records you created:
app.[your domain name]should be redirected to Kubernetes Trains Server node on port30080files.[your domain name]should be redirected to Kubernetes Trains Server node on port30081api.[your domain name]should be redirected to Kubernetes Trains Server node on port30008
Configuring Trains Agents in your cluster
In order to create Trains Agent instances as part of your deployment, create or update your local values.yaml file.
This values.yaml file should be used in your helm install command (see Deploying trains-server in Kubernetes Clusters Using Helm)
The file must contain the following values in the agent section:
numberOfTrainsAgents: controls the number of Trains Agent pods to be deployed. Each Agent pod will listen for and execute experiments from the Trains ServernvidiaGpusPerAgent: defines the number of GPUs required by each Agent podtrainsApiHost: the URL used to access the Trains API server, as defined in your load-balancer (usuallyhttps://api.[your domain name], see Accessing trains-server)trainsWebHost: the URL used to access the Trains Web-App, as defined in your load-balancer (usuallyhttps://app.[your domain name], see Accessing trains-server)trainsFilesHost: the URL used to access the Trains File Server, as defined in your load-balancer (usuallyhttps://files.[your domain name], see Accessing trains-server)
Additional optional values in the agent section include:
defaultBaseDocker: the default docker image used by the Agent running in the Agent pod in order to execute an experiment. Default isnvidia/cuda.agentVersion: determines the specific Agent version to be used in the deployment, for example"==0.13.3". Default isnull(use latest version)trainsGitUser/trainsGitPassword: GIT credentials used by Trains Agent running an experiment when cloning the GIT repository defined in the experiment, if defined. Default isnull(not used)awsAccessKeyId/awsSecretAccessKey/awsDefaultRegion: AWS account info used by the Trains Python package when uploading files to an AWS S3 buckets (not required if only using the default Trains File Server). Default isnull(not used)azureStorageAccount/azureStorageKey: Azure account info used by the Trains Python package when uploading files to MS Azure Blob Service (not required if only using the default Trains File Server). Default isnull(not used)
For example, the following values.yaml file requests 4 Agent instances in your deployment (see chart-example-values.yaml):
agent:
  numberOfTrainsAgents: 4
  nvidiaGpusPerAgent: 1
  defaultBaseDocker: "nvidia/cuda"
  trainsApiHost: "https://api.trains.mydomain.com"
  trainsWebHost: "https://app.trains.mydomain.com"
  trainsFilesHost: "https://files.trains.mydomain.com"
  trainsGitUser: null
  trainsGitPassword: null
  awsAccessKeyId: null
  awsSecretAccessKey: null
  awsDefaultRegion: null
  azureStorageAccount: null
  azureStorageKey: null
Configuring trains-server storage for NFS
The Trains Server deployment uses a PersistentVolume of type HostPath,
which uses a fixed path on the node labeled app: trains.
The existing chart supports changing the volume type to NFS,
by setting the use_nfs value and configuring the NFS persistent volume using additional values in your local values.yaml file:
storage:
  use_nfs: true
  nfs:
    server: "[nfs-server-ip-address]"
    base_path: "/nfs/path/for/trains/data"
Additional Configuration for trains-server
You can also configure the Trains Server for:
- fixed users (users with credentials)
- non-responsive experiment watchdog settings
For detailed instructions, see Configuring Trains Server in the Trains Documentation page.
License Information
- Trains Python Package is provided under the Apache License, Version 2.0
- Trains Agent is provided under the Apache License, Version 2.0
- Trains Server is provided under the Server Side Public License v1.0
Documentation, Community & Support
Allegro Trains documentation is available here
For more examples and use cases, check examples.
If you have any questions: post on our Slack Channel, or tag your questions on stackoverflow with 'trains' tag.
For feature requests or bug reports, please use GitHub issues.
Additionally, you can always find us at trains@allegro.ai