
End to End workflow for text to speech training with TAO Toolkit and deployment using Riva.
Train Adapt Optimize (TAO) Toolkit
Train Adapt Optimize (TAO) Toolkit is a python based AI toolkit for taking purpose-built pre-trained AI models and customizing them with your own data.
Transfer learning extracts learned features from an existing neural network to a new one. Transfer learning is often used when creating a large training dataset is not feasible.
Developers, researchers and software partners building intelligent AI apps and services, can bring their own data to fine-tune pre-trained models instead of going through the hassle of training from scratch.
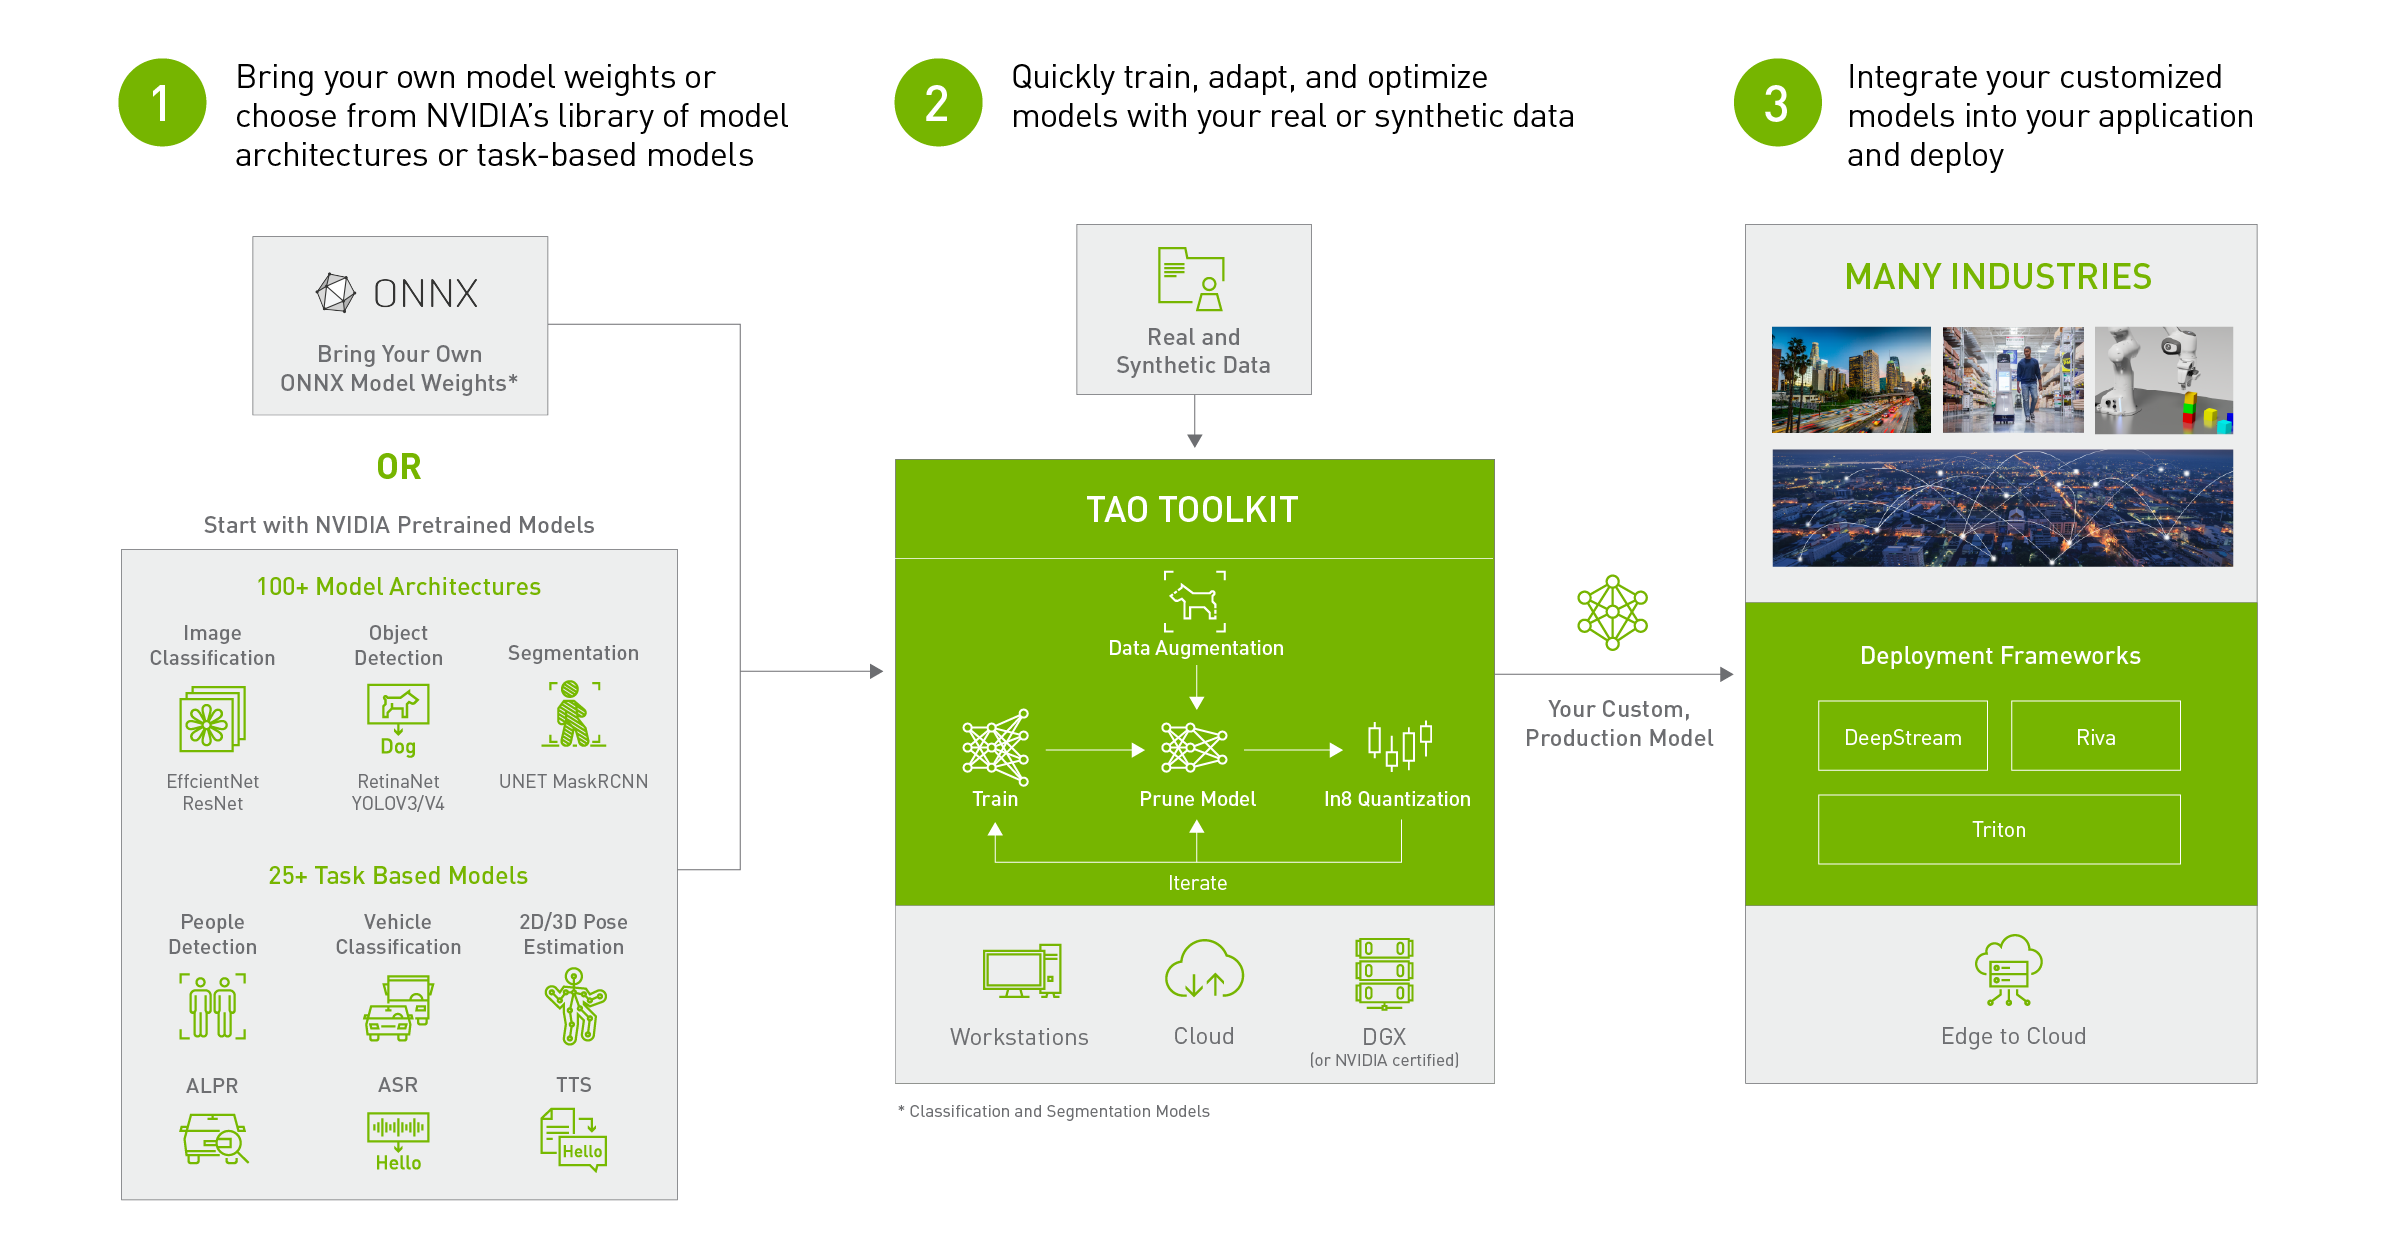
The goal of this toolkit is to reduce that 80 hour workload to an 8 hour workload, which can enable data scientist to have considerably more train-test iterations in the same time frame.
Let's see this in action with a use case for Speech Synthesis!
Text to Speech
Text to Speech (TTS) is often the last step in building a Conversational AI model. A TTS model converts text into audible speech. The main objective is to synthesize reasonable and natural speech for given text. Since there are no universal standard to measure quality of synthesized speech, you will need to listen to some inferred speech to tell whether a TTS model is well trained.
In TAO Toolkit, TTS is made up with two models: FastPitch for spectrogram generation and HiFiGAN as vocoder.
Let's Dig in: TTS using TAO
This notebook assumes that you are already familiar with TTS Training using TAO, as described in the text-to-speech-training notebook, and that you have a pretrained TTS model.
Installing and setting up TAO
For ease of use, please install TAO inside a python virtual environment. We recommend performing this step first and then launching the notebook from the virtual environment.
In addition to installing TAO python package, please make sure of the following software requirements:
- python 3.8+
- docker-ce > 19.03.5
- docker-API 1.40
- nvidia-container-toolkit > 1.3.0-1
- nvidia-container-runtime > 3.4.0-1
- nvidia-docker2 > 2.5.0-1
- nvidia-driver >= 455.23
Running the cell below installs TAO Toolkit.
After installing TAO, the next step is to setup the mounts for TAO. The TAO launcher uses docker containers under the hood, and for our data and results directory to be visible to the docker, they need to be mapped. The launcher can be configured using the config file ~/.tao_mounts.json. Apart from the mounts, you can also configure additional options like the Environment Variables and amount of Shared Memory available to the TAO launcher.
Replace the variables FIXME with the required paths enclosed in "" as a string.
IMPORTANT NOTE: The code below creates a sample ~/.tao_mounts.json file. Here, we can map directories in which we save the data, specs, results and cache. You should configure it for your specific case so these directories are correctly visible to the docker container.
You can check the docker image versions and the tasks that perform. You can also check this out with a tao --help or
Set Relevant Paths
Now that everything is setup, we would like to take a bit of time to explain the tao interface for ease of use. The command structure can be broken down as follows: tao <task name> <subcommand>
Let's see this in further detail.
Downloading Specs
TAO's Conversational AI Toolkit works off of spec files which make it easy to edit hyperparameters on the fly. We can proceed to downloading the spec files. The user may choose to modify/rewrite these specs, or even individually override them through the launcher. You can download the default spec files by using the download_specs command.
The -o argument indicating the folder where the default specification files will be downloaded, and -r that instructs the script where to save the logs. Make sure the -o points to an empty folder!
Data
For the rest of this notebook, it is assumed that you have:
- Pretrained FastPitch and HiFiGAN models that were trained on LJSpeech sampled at 22kHz
In the case that you are not using a TTS model trained on LJSpeech at the correct sampling rate. Please ensure that you have the original data, including wav files and a .json manifest file. If you have a TTS model but not at 22kHz, please ensure that you set the correct sampling rate, and fft parameters.
For the rest of the notebook, we will be using a toy dataset consisting of 5 mins of audio. This dataset is for demo purposes only. For a good quality model, we recommend at least 30 minutes of audio. We recommend using the NVIDIA Custom Voice Recorder tool, to generate a good dataset for finetuning.
Let's first download the original LJSpeech dataset and set variables that point to this as the original data's .json file.
After downloading, untar the dataset, and move it to the correct directory.
Pre-Processing
This step downloads audio to text file lists from NVIDIA for LJSpeech and generates the manifest files. If you use your own dataset, you have to generate three files: ljs_audio_text_train_filelist.txt, ljs_audio_text_val_filelist.txt, ljs_audio_text_test_filelist.txt yourself. Those files correspond to your train / val / test split. For each text file, the number of rows should be equal to number of samples in this split and each row should be like:
DUMMY/<file_name>.wav|<text_of_the_audio>
An example row is:
DUMMY/LJ045-0096.wav|Mrs. De Mohrenschildt thought that Oswald,
After having those three files in your data_dir, you can run following command as you would do for LJSpeech dataset.
Be patient! This step can take several minutes.
Let's now download the data from the NVIDIA Custom Voice Recorder tool, and place the data in the $HOST_DATA_DIR
Now that you have downloaded the data, let's make sure that the audio clips and sample at the same sampling frequency as the clips used to train the pretrained model. For the course of this notebook, NVIDIA recommends using a model trained on the LJSpeech dataset. The sampling rate for this model is 22.05kHz.
The first step is to create a json that contains data from both the original data and the finetuning data. We can do this using dataset_convert:
Getting Pitch Statistics
Training Fastpitch requires you to set 4 values for pitch extraction:
fmin: The minimum frequency value in Hz used to estimate the fundamental frequency (f0)fmax: The maximum frequency value in Hz used to estimate the fundamental frequency (f0)avg: The average used to normalize the pitchstd: The std deviation used to normalize the pitch
In order to get these, we first find a good fmin and fmax which are hyperparameters to librosa's pyin function.
After we set those, we can iterate over the finetuning dataset to extract the pitch mean and standard deviation.
Obtain fmin and fmax
To get fmin and fmax, we start with some defaults, and iterate through random samples of the dataset to ensure that pyin is correctly extracting the pitch.
We look at the plotted spectrogram as well as the predicted fundamental frequency, f0. We want the predicted f0 (the cyan line) to match the lowest energy band in the spectrogram. Here is an example of a good match between the predicted f0 and the spectrogram:

Here is an example of a bad match between the f0 and the spectrogram. The fmin was likely set too high. The f0 algorithm is missing the first two vocalizations, and is correctly matching the last half of speech. To fix this, the fmin should be set lower.

Here is an example of samples that have low frequency noise. In order to eliminate the effects of noise, you have to set fmin above the noise frequency. Unfortunately, this will result in degraded TTS quality. It would be best to re-record the data in a environment with less noise.

Note: You will have to run the below cell multiple times with different hyperparameters before you are able to find a good value for fmin and fmax.
We set the num_files parameter to 10, so as to visualize only 10 plots in the dataset. You may choose to increase or decrease this value to generate more or fewer plots
Note: As a starting point, we have set fmin to 80Hz and fmax to 2094 Hz.
Once you have chosen a good value for your pitch_fmin and pitch_fmax, the cell below will compute the pitch statistics (pitch_mean and pitch_std) to be used to finetune the model.
Setting the pitch_fmean and pitch_fmax based on the results from the cell above.
Finetuning
For finetuning TTS models in TAO, we use the tao spectro_gen finetune and tao vocoder finetune command with the following args:
- -m : Path to the model weights we want to finetune from
- -e : Path to the spec file
- -g : Number of GPUs to use
- -r : Path to the results folder
- -k : User specified encryption key to use while saving/loading the model
- Any overrides to the spec file
In order to get a finetuned TTS pipeline, you need to finetune FastPitch. For best results, you need to finetune HiFiGAN as well.
Please update the -m parameter to the path of your pre-trained checkpoint. This can be a previously trained .tlt or .nemo file.
Finetuning FastPitch
Finetuning HiFiGAN
In order to get the best audio from HiFiGAN, we need to finetune it:
- on the new speaker
- using mel spectrograms from our finetuned FastPitch Model
Let's first generate mels from our FastPitch model, and save it to a new .json manifest for use with HiFiGAN
Now let's finetune hifigan.
Please update the -m parameter to the path of your pre-trained checkpoint.
TTS Inference
As aforementioned, since there are no universal standard to measure quality of synthesized speech, you will need to listen to some inferred speech to tell whether a TTS model is well trained. Therefore, we do not provide evaluate functionality in TAO Toolkit for TTS but only provide infer functionality.
Generate spectrogram
The first step for inference is generating spectrogram. That's a numpy array (saved as .npy file) for a sentence which can be converted to voice by a vocoder. We use FastPitch we just trained to generate spectrogram
Please update the infer.yaml configuration file in the $HOST_DATA_DIR/specs to add new sentences. The sample infer.yaml file, contains 3 sentence texts.
input_batch:
  - "by the end of no such thing the audience , like beatrice , has a watchful affection for the monster ."
  - "director rob marshall went out gunning to make a great one ."
  - "uneasy mishmash of styles and genres ."
You may add new sentences by adding new lines to the input_batch field.
Generate sound file
The second step for inference is generating wav sound file based on spectrogram you generated in last step.
Debug
The data provided is only meant to be a sample to understand how finetuning works in TAO. In order to generate better speech quality, we recommend recording at least 30 mins of audio, and increasing the number of finetuning steps from the current trainer.max_steps=1000 to trainer.max_steps=5000 for both models.
TTS model export
With TAO, you can also export your model in a format that can deployed using Nvidia Riva, a highly performant application framework for multi-modal conversational AI services using GPUs! The same command for exporting to ONNX can be used here. The only small variation is the configuration for export_format in the spec file!
Export to ONNX
Executing the snippets in the cells below, allows you to generate a .eonnx model file for the spectrogram generator and vocoder models that were trained the preceding cells. These models are required to generate a complete Text-To-Speech pipeline.
Export to RIVA
Executing the snippets in the cells below, allows you to generate a .riva model file for the spectrogram generator and vocoder models that were trained the preceding cells. These models are required to generate a complete Text-To-Speech pipeline.
TTS Inference using ONNX
TAO provides the capability to use the exported .eonnx model for inference. The commands are very similar to the inference command for .tlt models. Again, the inputs in the spec file used is just for demo purposes, you may choose to try out your custom input!
Generate spectrogram
The first step for inference is generating spectrogram. That's a numpy array (saved as .npy file) for a sentence which can be converted to voice by a vocoder. We use FastPitch we just trained to generate spectrogram
Please update the infer.yaml configuration file in the $HOST_DATA_DIR/specs to add new sentences. The sample infer.yaml file, contains 3 sentence texts.
input_batch:
  - "by the end of no such thing the audience , like beatrice , has a watchful affection for the monster ."
  - "director rob marshall went out gunning to make a great one ."
  - "uneasy mishmash of styles and genres ."
You may add new sentences by adding new lines to the input_batch field.
Generate sound file
The second step for inference is generating wav sound file based on spectrogram you generated in last step.
If everything works properly, wav file below should sound exactly same as wav file in previous section
What's Next ?
You could use TAO to build custom models for your own applications, and deploy them to Nvidia Riva! To try deploying these models to RIVA, use the text-to-speech-deployment.ipynb as a quick sample.