
End to End sample workflow for Text Classification starting with training in TAO Toolkit and deployment using Riva.
Text Classification using Train Adapt Optimize (TAO) Toolkit
Transfer learning is a technique of extracting learned features from an existing neural network to a new one. It is a commonly used training technique where you use a model trained on one task and re-train to use it on a different task, when creating a large training dataset is not feasible.
**Train Adapt Optimize (TAO) Toolkit ** is a simple and easy-to-use python based AI toolkit for taking purpose-built pre-trained AI models and customizing them with users' own data.
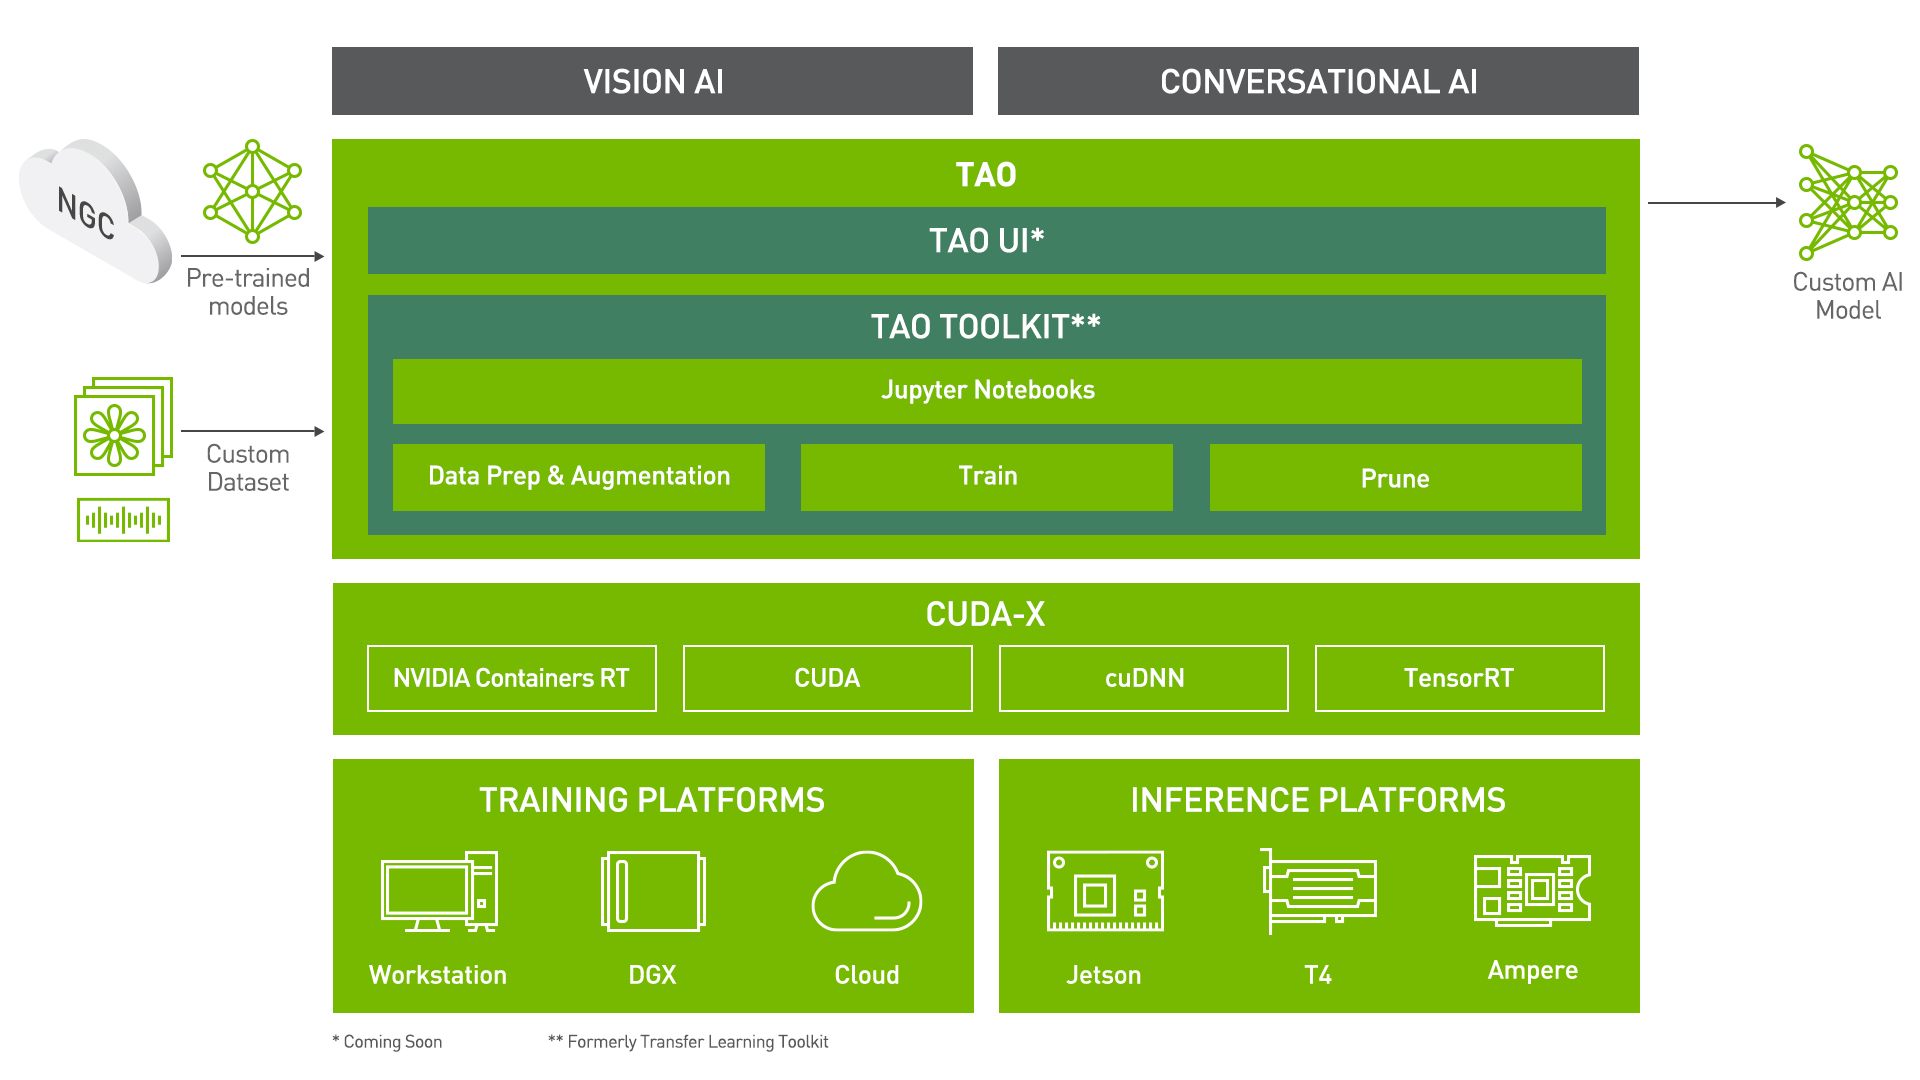
Let's see this in action with a use case for text classification.
Learning Objectives
In this notebook, you will learn how to leverage the simplicity and convenience of TAO to:
- Take a BERT Text Classification model, Train and Finetune it on the SST-2 dataset
- Run Evaluation and Inference
- Export the model for the ONNX format, or export to deployment on Riva.
The earlier sections in the notebook give a brief introduction to the Text Classification task and the SST-2 dataset. If you are already familiar with these, and want to jump right into the meat of the matter, you can start at section on Download and preprocess the dataset.
Pre-requisites
Please make sure of the following software requirements:
- python 3.6.9
- docker-ce > 19.03.5
- docker-API 1.40
- nvidia-container-toolkit > 1.3.0-1
- nvidia-container-runtime > 3.4.0-1
- nvidia-docker2 > 2.5.0-1
- nvidia-driver >= 455.23
Next step is to install TAO package. For ease of use, please install TAO inside a python virtual environment. We recommend performing this step first and then launching the notebook from the virtual environment.
Let's install TAO. It is a simple pip install!
You can check the docker image versions and the tasks that tao can perform. You can also check this out with a tao --help or
Check if the GPUs are available.
Text Classification
Task Description
Text Classification is one of the most common tasks in NLP, which is the process of categorizing the text into a group of words. By using NLP, text classification can automatically analyze text and then assign a set of predefined tags or categories based on its context. It is applied in a wide variety of applications, including sentiment analysis, spam filtering, news categorization, domain/intent detection for dialogue systems, etc. The dataset we use in this notebook, SST-2, pose this as a sentiment analysis task, i.e. given a piece of text, the goal is to estimate its sentiment polarity based solely on its content.
For every entry in the training dataset, we predict the sentiment label of the sentence.
Datasets
This model supports text classification problems such as sentiment analysis or domain/intent detection for dialogue systems, as long as the data follows the format specified below.
The Text Classification Model requires the data to be stored in TAB separated files (.tsv) with two columns of sentence and label. Each line of the data file contains text sequences, where words are separated with spaces and label separated with [TAB], i.e.:
[WORD] [SPACE] [WORD] [SPACE] [WORD] [TAB] [LABEL]
For example:
hide new secretions from the parental units [TAB] 0

that loves its characters and communicates something rather beautiful about human nature [TAB] 1

...
If your dataset is stored in another format, you need to convert it to this format to use the Text Classification Model.
The SST-2 Dataset
The Stanford Sentiment Treebank dataset contains 215,154 phrases with fine-grained sentiment labels in the parse trees of 11,855 sentences from movie reviews. Model performances are evaluated either based on a fine-grained (5-way) or binary classification model based on accuracy. The SST-2 Binary classification version is identical to SST-1, but with neutral reviews deleted.
The SST-2 format consists of a .tsv file for each dataset split, i.e. train, dev, and test data. Each entry has a space-separated sentence, followed by a tab and a label.
For example:
sentence	label

excruciatingly unfunny and pitifully unromantic 	0

enriched by an imaginatively mixed cast of antic spirits 	1

...
Download and preprocess the dataset
We provide a function, download_sst2, for downloading the data. Please refer to the TAO workflow section for the data preprocessing and conversion part.
Downloading the dataset
For convenience, you may use the code below to download the dataset.
After executing the cell below, $DATA_DIR/SST-2 will contain the following 3 files and 1 folder:
- dev.tsv
- test.tsv
- train.tsv
- original
TAO workflow
The rest of the notebook shows what a sample TAO workflow looks like.
Setting TAO Mounts
Now that our dataset has been downloaded, an important step in using TAO is to set up the directory mounts. The TAO launcher uses docker containers under the hood, and for our data and results directory to be visible to the docker, they need to be mapped.
The launcher can be configured using the config file ~/.tao_mounts.json. Apart from the mounts, you can also configure additional options like the Environment Variables and amount of Shared Memory available to the TAO launcher.
IMPORTANT NOTE: The code below creates a sample .tlt_mounts.json file. Here, we can map directories in which we save the data, specs, results and cache. You should configure it for your specific case such your these directories are correctly visible to the docker container. Please also ensure that the source directories exist on your machine!
The rest of the notebook exemplifies the simplicity of the TAO workflow.
Users with basic knowledge of Deep Learning can get started building their own custom models using a simple specification file. It's essentially just one command each to run data preprocessing, training, fine-tuning, evaluation, inference, and export! All configurations happen through YAML spec files.
Configuration/Specification Files
The essence of all commands in TAO lies in the YAML specification files. There are sample specification files already available for you to use directly or as reference to create your own.
Through these specification files, you can tune many knobs like the model, dataset, hyperparameters, optimizers, etc.
Each command (like download_and_convert, train, finetune, evaluate, infer, etc.) should have a dedicated specification file with configurations pertinent to it.
Here is an example of the training spec file:
trainer:
  max_epochs: 100

# Name of the .tlt file where trained model will be saved.
save_to: trained-model.tlt

model:
  # Labels that will be used to "decode" predictions.
  labels:
    "0": "negative"
    "1": "positive"

  tokenizer:
      tokenizer_name: ${model.language_model.pretrained_model_name} # or sentencepiece
      vocab_file: null # path to vocab file
      tokenizer_model: null # only used if tokenizer is sentencepiece
      special_tokens: null

 language_model:
    pretrained_model_name: bert-base-uncased
    lm_checkpoint: null
    config_file: null # json file, precedence over config
    config: null

  classifier_head:
    # This comes directly from number of labels/target classes.
    num_output_layers: 2
    fc_dropout: 0.1


training_ds:
  file_path: ???
  batch_size: 64
  shuffle: true
  num_samples: -1 # number of samples to be considered, -1 means all the dataset

...
Setting relevant paths
Now that everything is setup, we would like to take a bit of time to explain the tao interface for ease of use. The command structure can be broken down as follows: tao <task name> <subcommand>
Let's see this in further detail.
Downloading Specs
We can proceed to downloading the spec files. The user may choose to modify/rewrite these specs, or even individually override them through the launcher. You can download the default spec files by using the download_specs command.
The -o argument indicating the folder where the default specification files will be downloaded, and -r that instructs the script where to save the logs. Make sure the -o points to an empty folder!
Training
Training a model using TAO is as simple as configuring your spec file and running the train command. The code cell below uses the default train.yaml available for users as reference. It is configured by default to use the bert-base-uncased pretrained model. Additionally, these configurations could easily be overridden using the tao-launcher CLI as shown below. For instance, below we override the training_ds.file, validation_ds.file, trainer.max_epochs, training_ds.num_workers and validation_ds.num_workers configurations to suit our needs. We encourage you to take a look at the .yaml spec files we provide!
In order to get good results, you need to train for 20-50 epochs (depends on the size of the data). Training with 1 epoch in the tutorial is just for demonstration purposes.
For training a Text Classification model in TAO, we use the tao text_classification train command with the following args:
-e: Path to the spec file-g: Number of GPUs to use-k: User specified encryption key to use while saving/loading the model-r: Path to a folder where the outputs should be written. Make sure this is mapped in tlt_mounts.json- Any overrides to the spec file eg. trainer.max_epochs
More details about these arguments are present in the TAO Getting Started Guide
NOTE: All file paths corresponds to the destination mounted directory that is visible in the TAO docker container used in backend.
Also worth noting is that the first time you run training on the dataset, it will run pre-processing and save that processed data in the same directory as the dataset.
The train command produces a .tlt file called trained-model.tlt saved at $RESULTS_DIR/train/checkpoints/trained-model.tlt. This file can be fed directly into the fine-tuning stage as we see in the next block.
Other tips and tricks:
- To accelerate the training without loss of quality, it is possible to train with these parameters:
trainer.amp_level="O1"andtrainer.precision=16for reduced precision. - The batch size (
training_ds.batch_size) may influence the validation accuracy. Larger batch sizes are faster to train with, however, you may get slightly better results with smaller batches.
Fine-Tuning
The command for fine-tuning is very similar to that of training. Instead of tao text_classification train, we use tao text_classification finetune instead. We also specify the spec file corresponding to fine-tuning. All commands in TAO follow a similar pattern, streamlining the workflow even further!
Note: we use SST-2 dataset here to showcase how to use the fine-tuning command, however we recommend bringing your own data for fine-tuning on the pre-trained models. You would need to make sure your dataset is downloaded and pre-processed so that it's ready for use.
Note: If you wish to proceed with a trained dataset for better inference results, you can find a .nemo model here.
Simply re-name the .nemo file to .tlt and pass it through the finetune pipeline.
This command will generate a fine-tuned model finetuned-model.tlt at $RESULTS_DIR/finetune/checkpoints
Evaluation
The evaluation spec .yaml is as simple as:
test_ds:
  file: ??? # e.g. $DATA_DIR/test.tsv
  batch_size: 32
  shuffle: false
  num_samples: 500
Below, we use tao text_classification evaluate and override the test data configuration by specifying test_ds.file_path. Other arguments follow the same pattern as before!
On evaluating the model you will get some results, and based on that you can either retrain the model for more epochs, or continue with the inference.
Inference
Inference using a .tlt trained or fine-tuned model uses the tao text_classification infer command.
The infer.yaml is also straightforward, which includes some "simulated" user input, here we start with a batch of four samples.
- "by the end of no such thing the audience , like beatrice , has a watchful affection for the monster ."
- "director rob marshall went out gunning to make a great one ."
- "uneasy mishmash of styles and genres ."
- "I love exotic science fiction / fantasy movies but this one was very unpleasant to watch . Suggestions and images of child abuse , mutilated bodies (live or dead) , other gruesome scenes , plot holes , boring acting made this a regrettable experience , The basic idea of entering another person's mind is not even new to the movies or TV (An Outer Limits episode was better at exploring this idea) . i gave it 4 / 10 since some special effects were nice ."
We encourage you to try out custom inputs as an exercise.
Export to ONNX
ONNX is a popular open format for machine learning models. It enables interoperability between different frameworks, making the path to production much easier.
TAO provides commands to export the .tlt model to the ONNX format in an .eonnx archive. The export_format configuration can be set to ONNX to achieve this.
Sample usage of the tao text_classification export command is shown in the following code cell. The export.yaml file we use looks like:
# Name of the .tlt EFF archive to be loaded/model to be exported.
restore_from: finetuned-model.tlt

# Set export format: ONNX | RIVA
export_format: ONNX

# Output EFF archive containing ONNX.
export_to: exported-model.eonnx
This command exports the model as exported-model.eonnx which is essentially an archive containing the .onnx model.
Inference using ONNX
TAO provides the capability to use the exported .eonnx model for inference.
The command tao text_classification infer_onnx is very similar to the inference command for .tlt models. Again, the input file includes some "simulated" user input, we start with a batch of four samples for demo purposes, and encourage you to try out custom inputs as an exercise.
Export to Riva
With TAO, you can also export your model in a format that can deployed using NVIDIA Riva, a highly performant application framework for multi-modal conversational AI services using GPUs! The same command for exporting to ONNX can be used here. The only small variation is the configuration for export_format in the spec file!
The model is exported as tc-model.riva which is in a format suited for deployment in Riva.
What's Next?
You can use TAO to build custom models for your own applications, or deploy the custom models to NVIDIA Riva.