VISTA-2D is a comprehensive training and inference pipeline for cell segmentation in imaging applications.
Overview
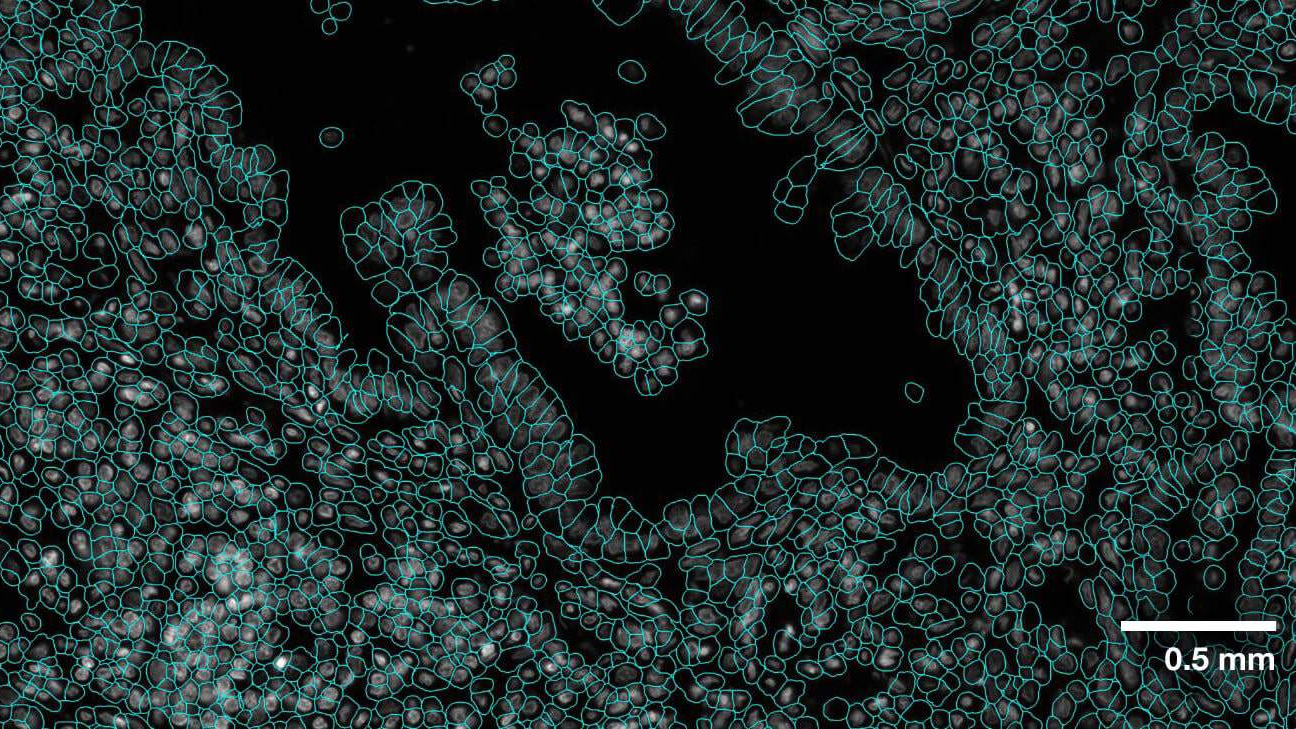
The VISTA2D is a cell segmentation training and inference pipeline for cell imaging [Blog].
A pretrained model was trained on collection of 15K public microscopy images. The data collection and training can be reproduced following the download_preprocessor/. Alternatively, the model can be retrained on your own dataset. The pretrained vista2d model achieves good performance on diverse set of cell types, microscopy image modalities, and can be further finetuned if necessary. The codebase utilizes several components from other great works including SegmentAnything and Cellpose, which must be pip installed as dependencies. Vista2D codebase follows MONAI bundle format and its specifications.
Model highlights
- Robust deep learning algorithm based on transformers
- Generalist model as compared to specialist models
- Multiple dataset sources and file formats supported
- Multiple modalities of imaging data collectively supported
- Multi-GPU and multinode training support
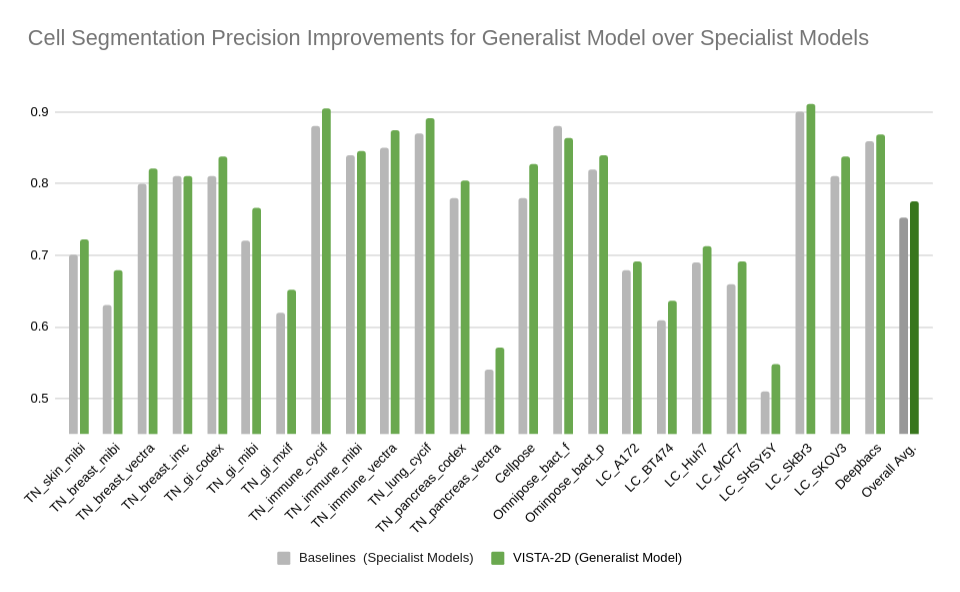
Generalization performance
Evaluation was performed for the VISTA2D model with multiple public datasets, such as TissueNet, LIVECell, Omnipose, DeepBacs, Cellpose, and more. For more details about dataset licenses, please refer to /docs/data_license.txt. A total of ~15K annotated cell images were collected to train the generalist VISTA2D model. This ensured broad coverage of many different types of cells, which were acquired by various imaging acquisition types. The benchmark results of the experiment were performed on held-out test sets for each public dataset that were already defined by the dataset contributors. Average precision at an IoU threshold of 0.5 was used for evaluating performance. The benchmark results are reported in comparison with the best numbers found in the literature, in addition to a specialist VISTA2D model trained only on a particular dataset or a subset of data.
TensorRT speedup
The vista2d bundle supports acceleration with TensorRT. The table below displays the speedup ratios observed on an A100 80G GPU. Please note that 32-bit precision models are benchmarked with tf32 weight format.
| method | torch_tf32(ms) | torch_amp(ms) | trt_tf32(ms) | trt_fp16(ms) | speedup amp | speedup tf32 | speedup fp16 | amp vs fp16 |
|---|---|---|---|---|---|---|---|---|
| model computation | 39.72 | 39.68 | 26.13 | 17.32 | 1.00 | 1.52 | 2.29 | 2.29 |
| end2end | 1562 | 1903 | 1494 | 1440 | 0.82 | 1.05 | 1.08 | 1.32 |
Where:
model computationmeans the speedup ratio of model's inference with a random input without preprocessing and postprocessingend2endmeans run the bundle end-to-end with the TensorRT based model.torch_tf32andtorch_ampare for the PyTorch models with or withoutampmode.trt_tf32andtrt_fp16are for the TensorRT based models converted in corresponding precision.speedup amp,speedup tf32andspeedup fp16are the speedup ratios of corresponding models versus the PyTorch float32 modelamp vs fp16is the speedup ratio between the PyTorch amp model and the TensorRT float16 based model.
This result is benchmarked under:
- TensorRT: 10.3.0+cuda12.6
- Torch-TensorRT Version: 2.4.0
- CPU Architecture: x86-64
- OS: ubuntu 20.04
- Python version:3.10.12
- CUDA version: 12.6
- GPU models and configuration: A100 80G
Prepare Data Lists and Datasets
The default dataset for training, validation, and inference is the Cellpose dataset. Please follow the download_preprocessor/ to prepare the dataset before executing any commands below.
Additionally, all data lists are available in the datalists.zip file located in the root directory of the bundle. Extract the contents of the .zip file to access the data lists.
Dependencies
Please refer to the required_packages_version section in configs/metadata.json to install all necessary dependencies before execution. If you’re using the MONAI container, you can simply run the commands below and ignore any "opencv-python-headless not installed" error message, as this package is already included in the container.
pip install fastremap==1.15.0 roifile==2024.5.24 natsort==8.4.0
pip install --no-deps cellpose
Important Note: if your environment already contains OpenCV, installing cellpose may lead to conflicts and produce errors such as:
AttributeError: partially initialized module 'cv2' has no attribute 'dnn' (most likely due to a circular import)
To resolve this, uninstall OpenCV first, and then install cellpose using the following commands:
pip uninstall -y opencv && rm /usr/local/lib/python3.*/dist-packages/cv2
Make sure to replace 3.* with your actual Python version (e.g., 3.10).
Alternatively, you can install cellpose without its dependencies to avoid potential conflicts:
pip install --no-deps cellpose
Execute training
python -m monai.bundle run_workflow "scripts.workflow.VistaCell" --config_file configs/hyper_parameters.yaml
You can override the basedir to specify a different dataset directory by using the following command:
python -m monai.bundle run_workflow "scripts.workflow.VistaCell" --config_file configs/hyper_parameters.yaml --basedir <actual dataset ditectory>
Quick run with a few data points
python -m monai.bundle run_workflow "scripts.workflow.VistaCell" --config_file configs/hyper_parameters.yaml --quick True --train#trainer#max_epochs 3
Execute multi-GPU training
torchrun --nproc_per_node=gpu -m monai.bundle run_workflow "scripts.workflow.VistaCell" --config_file configs/hyper_parameters.yaml
Execute validation
python -m monai.bundle run_workflow "scripts.workflow.VistaCell" --config_file configs/hyper_parameters.yaml --pretrained_ckpt_name model.pt --mode eval
(can append --quick True for quick demoing)
Execute multi-GPU validation
torchrun --nproc_per_node=gpu -m monai.bundle run_workflow "scripts.workflow.VistaCell" --config_file configs/hyper_parameters.yaml --mode eval
Execute inference
python -m monai.bundle run --config_file configs/inference.json
Please note that the data used in this config file is: "/cellpose_dataset/test/001_img.png", if the dataset path is different or you want to do inference on another file, please modify in configs/inference.json accordingly.
Execute inference with the TensorRT model:
python -m monai.bundle run --config_file "['configs/inference.json', 'configs/inference_trt.json']"
Execute multi-GPU inference
torchrun --nproc_per_node=gpu -m monai.bundle run_workflow "scripts.workflow.VistaCell" --config_file configs/hyper_parameters.yaml --mode infer --pretrained_ckpt_name model.pt
(can append --quick True for quick demoing)
Finetune starting from a trained checkpoint
(we use a smaller learning rate, small number of epochs, and initialize from a checkpoint)
python -m monai.bundle run_workflow "scripts.workflow.VistaCell" --config_file configs/hyper_parameters.yaml --learning_rate=0.001 --train#trainer#max_epochs 20 --pretrained_ckpt_path /path/to/saved/model.pt
Configuration options
To disable the segmentation writing:
--postprocessing []
Load a checkpoint for validation or inference (relative path within results directory):
--pretrained_ckpt_name "model.pt"
Load a checkpoint for validation or inference (absolute path):
--pretrained_ckpt_path "/path/to/another/location/model.pt"
--mode eval or --mode inferwill use the corresponding configurations from the validate or infer
of the configs/hyper_parameters.yaml.
By default the generated model.pt corresponds to the checkpoint at the best validation score,
model_final.pt is the checkpoint after the latest training epoch.
Development
For development purposes it's possible to run the script directly (without monai bundle calls)
python scripts/workflow.py --config_file configs/hyper_parameters.yaml ...
torchrun --nproc_per_node=gpu -m  scripts/workflow.py --config_file configs/hyper_parameters.yaml  ..
MLFlow support
Enable MLFlow logging by specifying "mlflow_tracking_uri" (can be local or remote URL).
python -m monai.bundle run_workflow "scripts.workflow.VistaCell" --config_file configs/hyper_parameters.yaml --mlflow_tracking_uri=http://127.0.0.1:8080
Optionally use "--mlflow_run_name=.." to specify MLFlow experiment name, and "--mlflow_log_system_metrics=True/False" to enable logging of CPU/GPU resources (requires pip install psutil pynvml)
Unit tests
Test single GPU training:
python unit_tests/test_vista2d.py
Test multi-GPU training (may need to uncomment the "--standalone" in the unit_tests/utils.py file):
python unit_tests/test_vista2d_mgpu.py
Compute Requirements
Min GPU memory requirements 16Gb.
Contributing
Vista2D codebase follows MONAI bundle format and its specifications. Make sure to run pre-commit before committing code changes to git
pip install pre-commit
python3 -m pre_commit run --all-files
Community
Join the conversation on Twitter @ProjectMONAI or join our Slack channel.
Ask and answer questions on MONAI VISTA's GitHub discussions tab.
License
The codebase is under Apache 2.0 Licence. The model weight is released under CC-BY-NC-SA-4.0. For various public data licenses please see data_license.txt.